Quick Answer: Yes — attaching a chicken coop and run to a greenhouse is a well-established permaculture technique that creates a genuinely symbiotic system. Chickens provide body heat, CO₂, and manure to the greenhouse; the greenhouse returns warmth, shelter, and foraging opportunities to the flock. Done right, the setup can cut heating costs for both spaces by 20–40%.
If you’ve been asking around homesteading forums — “does anyone here have a greenhouse with an attached chicken coop and run?” — you’re not alone. This integrated design has roots in the work of permaculture pioneers like Bill Mollison and Sepp Holzer, and it’s gaining serious traction among backyard keepers who want their systems to work together rather than separately. This guide covers structural design, breed selection, ventilation, feeding, and seasonal management from first principles.
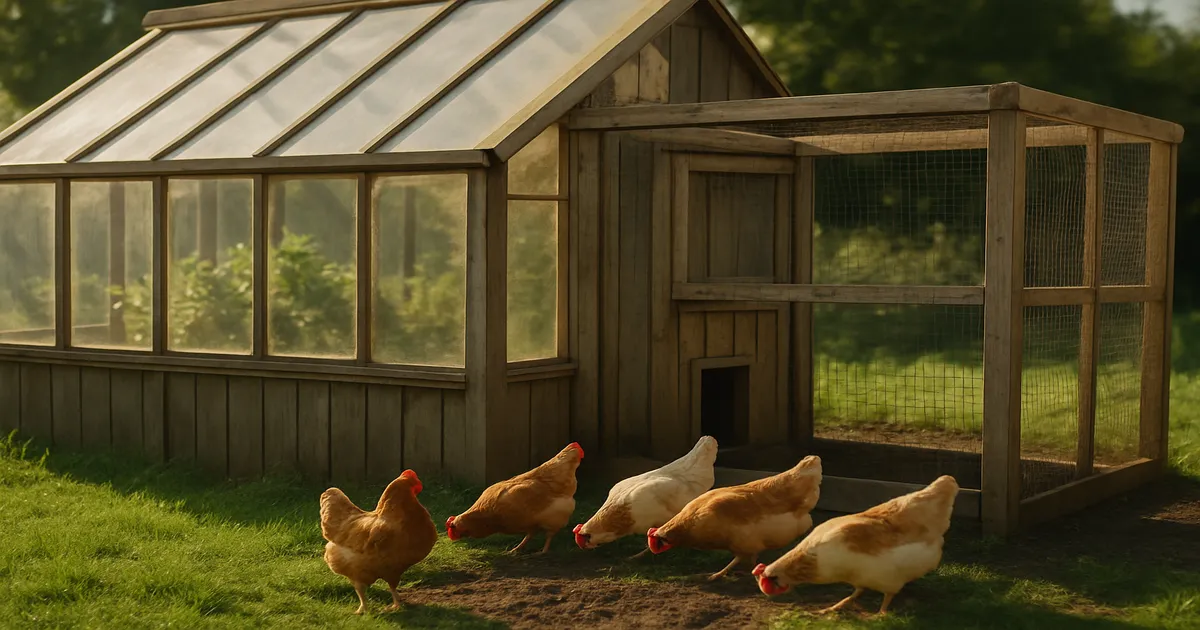
Can You Really Attach a Chicken Coop and Run to a Greenhouse?
What Is an Integrated Greenhouse-Coop System?
The concept is straightforward: your chicken coop shares a wall with your greenhouse, and the run sits on the exterior. Heat, gases, and nutrients flow between the two spaces in ways that benefit both.
A resting hen produces around 10 BTUs of body heat per hour. Multiply that by a small flock of six birds and you have a meaningful, free heat source on cold nights. In return, the greenhouse buffers the coop from wind and freezing temperatures, reducing the energy your birds burn just staying warm. It’s a closed loop that makes both systems more efficient.
How to Design a Greenhouse with an Attached Chicken Coop and Run
Positioning the Coop on the North Wall
In the Northern Hemisphere, place the coop on the north wall of the greenhouse. This keeps the solid structure out of the sun’s path so your plants still get full southern light exposure. The shared wall then sits between the warmest part of the greenhouse and the coop interior — exactly where you want passive heat transfer to happen.
Designing the Shared Wall for Heat Transfer
Insulate the coop side of the shared wall, but keep the greenhouse-facing side thermally conductive. A single-layer wood or masonry wall works well. Place thermal mass elements — water barrels, stone flooring, or concrete blocks — directly against this wall on the greenhouse side. They absorb daytime solar heat and release it slowly overnight into the coop.
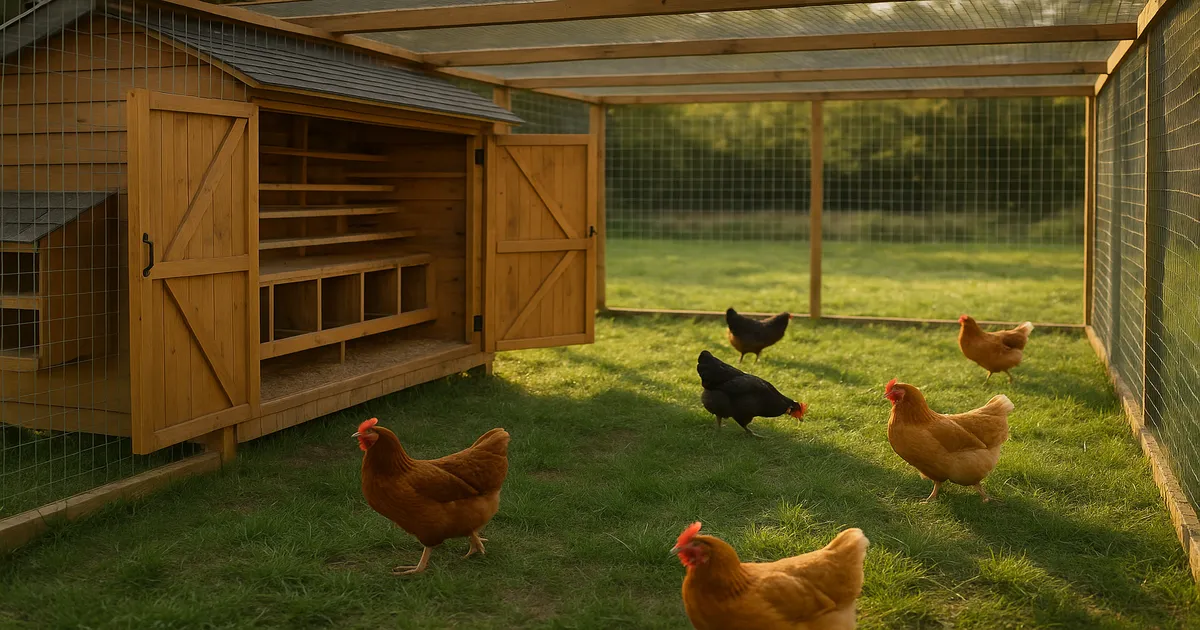
Planning the Exterior Run
The outdoor run should extend from the south or east exterior of the greenhouse, giving your birds maximum winter sun for both warmth and natural laying light. Size it generously: 15–20 sq ft per bird as a baseline, or 25–30 sq ft per bird if greenhouse interior access will be limited.
Controlling Chicken Access to the Greenhouse Interior
A simple pop door or sliding panel in the shared wall lets you decide exactly when chickens enter. The key rule: only allow access when plants are well established, or use supervised sessions of 30–60 minutes for pest cleanup. Protect seedlings and transplants with 18–24 inch hardware cloth barriers — low enough to be temporary, sturdy enough to matter.
Predator-Proofing the Entire Integrated Structure
Predator-proofing is non-negotiable. The most common mistake is using chicken wire. Chicken wire keeps chickens in; it does not keep predators out.
- Hardware cloth (½-inch mesh) on every opening, including vents
- Bury hardware cloth 12 inches deep or bend it outward in an L-shaped apron to stop diggers
- Double-latch all doors — raccoons reliably defeat single latches
- Install an automatic pop door on a timer or light sensor (ChickenGuard Extreme)
- Cover the run roof with hardware cloth or welded 2×4-inch wire mesh to block aerial predators
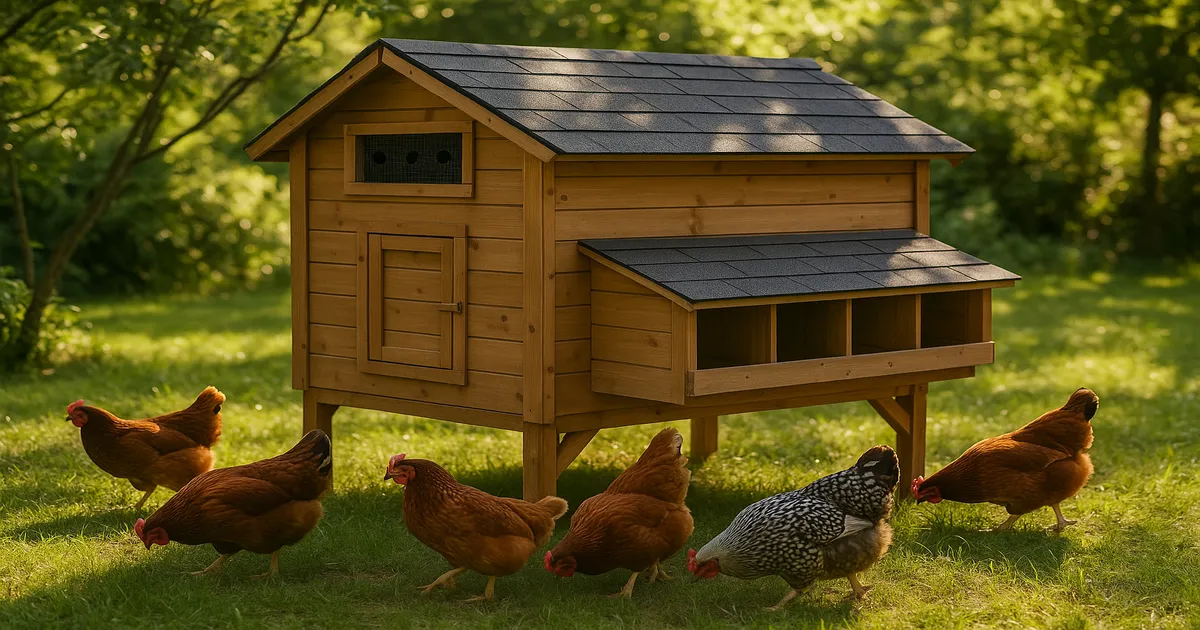
Space Requirements: Coop, Run, and Greenhouse Access Zones
Indoor Coop Square Footage Per Bird
- Minimum: 4 sq ft per standard bird
- Recommended: 6–8 sq ft per bird for a calmer, healthier flock
- Bantams (Silkie, Sebright): 2–3 sq ft per bird
Overcrowding is the single biggest driver of pecking, stress, and disease spread. When in doubt, build bigger.
Outdoor Run Space Guidelines
- Minimum: 10 sq ft per bird
- Recommended: 15–20 sq ft per bird
- With limited greenhouse access: 25–30 sq ft per bird
- If you’re using the deep litter method in the run, aim for at least 20 sq ft per bird to keep the system functional
Roost Bar and Nesting Box Specifications
Roost bars need 10–12 inches of linear space per standard bird and a 1.5–2 inch diameter — wide enough for hens to cover their toes with their breast feathers while sleeping, which is your best defense against frostbite. Set bars 18–36 inches off the floor, always higher than your nesting boxes.
For nesting boxes, the ratio is one box per 3–4 hens. Standard dimensions are 12×12×12 inches; go up to 14×14×14 for large breeds. If egg eating becomes a problem, roll-away nesting boxes are worth considering — eggs roll out of reach immediately after laying.
Ventilation, Humidity, and Insulation in a Greenhouse-Coop
Why Humidity Is the Biggest Challenge in This System
Humidity is the issue most people underestimate when combining these two spaces. A greenhouse is already moisture-rich from irrigation and plant transpiration. Add chicken respiration, droppings, and open waterers, and you can hit dangerous humidity levels fast. The downstream consequences are wet bedding, respiratory illness in your flock, and fungal problems in your plants.
Target 50–70% relative humidity in the coop and keep ammonia below 25 ppm. If you can smell ammonia when you walk in, it’s already too high.
Ventilation Ratios and Placement
- Minimum: 1 sq ft of ventilation per 10 sq ft of floor space
- Humid climates: 1 sq ft per 4 sq ft of floor space
- Place vents high on the walls, near the roofline, so moisture and ammonia escape without creating drafts at bird level
- A thermostat-controlled exhaust fan at the coop-greenhouse junction is the single most effective humidity management tool in this system
Managing Ammonia Levels
The deep litter method, when managed correctly, actually helps here. Beneficial bacteria in the litter break down ammonia-producing compounds. Keep litter at 4–6 inches deep, turn it regularly, and add fresh carbon material — pine shavings or straw — when it starts to smell. Never let litter become wet and compacted.
Insulation Recommendations by Climate Zone
In USDA Zone 5 and colder, insulate coop walls to at least R-13 (standard fiberglass batt). In milder zones, a well-built wood structure with a thermal-mass shared wall may be sufficient. The goal isn’t to keep the coop tropical — cold-hardy breeds are comfortable down to 0°F (-18°C) — it’s to keep temperatures above 32°F (0°C) and prevent moisture from condensing on cold surfaces.
Safe Heating Options
Heat lamps are the leading cause of coop fires. In a greenhouse setting surrounded by dry plant material and wood, the risk is even higher. If you need supplemental heat, use a flat-panel radiant heater rated for agricultural use. These mount flush to the wall, have no exposed heating elements, and are far safer than any bulb-based option.
Best Chicken Breeds for a Greenhouse-Coop Integration
Key Traits to Look for
The four traits that matter most in this system: calm temperament, cold hardiness, reasonable heat tolerance, and consistent egg production. Flighty or high-strung breeds cause stress for themselves, your plants, and you.
Top Picks: Buff Orpington, Barred Rock, and Speckled Sussex
Buff Orpington is the gold standard for greenhouse integration. These large, fluffy birds are exceptionally gentle — genuinely the least likely breed to cause plant damage during supervised access sessions. They’re cold-hardy to 0°F (-18°C) and lay 3–4 large light-brown eggs per week. The trade-off is a tendency toward broodiness, so factor that into your production planning.
Barred Plymouth Rock brings adaptability. They handle both free-range and confined systems well, lay 4–5 large brown eggs per week, and have the calm, curious temperament that works well in a structured greenhouse environment. They’re also strong winter layers — a real advantage when you’re relying on consistent production.
Speckled Sussex is the best forager of the three. They’re inquisitive, enthusiastic pest hunters, which makes them particularly valuable for end-of-season greenhouse cleanup. Expect 4–5 large light-brown eggs per week and a bird that handles both cold and heat without drama.
Cold-Hardy Options: Rhode Island Red and Easter Egger
Rhode Island Red is one of the most productive dual-purpose breeds available — 5–6 large brown eggs per week, up to 300 per year in peak condition. They can be assertive in mixed flocks, so watch flock dynamics if you’re combining breeds. Their single comb is a slight frostbite risk in very cold climates, but manageable with good coop design.
Easter Egger solves that problem entirely. Their pea combs have minimal surface area, making them among the most frostbite-resistant breeds available. They lay 4–5 blue or green eggs per week — a genuine selling point at markets — and are friendly and active without being destructive.
Lowest Plant-Damage Risk: The Silkie
If plant protection is your top priority, Silkies are in a category of their own. They’re calm to the point of being lap chickens, they’re poor fliers (making containment easy), and they weigh only 2–3 lbs — far less scratch damage per bird than a standard breed. The trade-off is production: only 2–3 small cream or tinted eggs per week, and a strong broody tendency. They work best as an addition to a mixed flock rather than the sole breed.
Breeds to Avoid in This System
Leghorns are brilliant layers but genuinely high-strung. In a confined greenhouse environment, that nervous energy translates to stressed plants, stressed flockmates, and stressed keepers. Cornish Cross are meat birds and completely inappropriate for this system. Polish breeds, with their large crests, are prone to vision problems and stress in variable-temperature environments, making them a poor fit here.
Breed Comparison at a Glance
| Breed | Eggs/Week | Eggs/Year | Egg Color | Temperament | Cold Hardy |
|---|---|---|---|---|---|
| Rhode Island Red | 5–6 | 250–300 | Brown | Active, assertive | Good |
| Buff Orpington | 3–4 | 150–200 | Light brown | Very gentle | Excellent |
| Barred Plymouth Rock | 4–5 | 200–280 | Brown | Docile, curious | Excellent |
| Easter Egger | 4–5 | 200–250 | Blue/Green | Friendly | Excellent |
| Silkie | 2–3 | 100–120 | Cream/Tinted | Extremely calm | Moderate |
| Speckled Sussex | 4–5 | 200–250 | Light brown | Inquisitive, calm | Good |
Egg Production in a Greenhouse-Coop System
How the Greenhouse Extends Natural Laying Light
Hens need 14–16 hours of light per day for peak production. In winter, natural daylight drops to 8–10 hours in most temperate climates — enough to trigger a 50–70% production drop without intervention. The greenhouse gives you a head start: glass or polycarbonate panels can extend effective natural light exposure by 1–2 hours compared to a standard outdoor coop, simply by capturing and diffusing more ambient light.
Supplemental Lighting: Timing and Bulb Recommendations
Add supplemental light in the pre-dawn hours on a timer rather than extending evenings. When the timer cuts off, hens are already in the coop and roosting naturally — there’s no abrupt darkness to disorient them. A 9-watt warm-spectrum LED bulb is sufficient for a standard backyard coop.
Managing Broodiness and Molt
Broody breeds — particularly Silkies, Buff Orpingtons, and Speckled Sussex — will stop laying for roughly 3 weeks of sitting plus another 6–8 weeks of post-hatch recovery if you let them raise chicks. In a production-focused system, break broodiness early by moving the hen to a wire-bottomed cage with good airflow for 3–7 days. It interrupts the hormonal cycle driving the behavior without causing harm.
Expect a 6–12 week production halt when hens molt, typically September through November. During this window, bump protein intake to 20–22% and add black oil sunflower seeds to support feather regrowth. Molt season is also an excellent time to use your chickens for greenhouse pest cleanup before replanting for spring.
Feeding and Nutrition for Greenhouse-Integrated Flocks
Layer Feed, Protein, and Life Stages
| Life Stage | Feed Type | Protein % | Notes |
|---|---|---|---|
| 0–8 weeks | Chick Starter | 18–20% | Medicated option available for coccidiosis prevention |
| 8–18 weeks | Grower/Developer | 15–17% | Reduce protein to avoid early-lay kidney stress |
| 18+ weeks (laying) | Layer Feed | 15–17% | Includes 3–4% calcium |
| Molting hens | High-protein supplement | 20–22% | Add black oil sunflower seeds; temporarily reduce calcium |
A standard laying hen eats about ¼ lb (4 oz) of feed per day. Increase that by 10–15% in winter when birds burn more calories staying warm, and another 10% during molt.
Fermented Feed
Fermented feed suits greenhouse-coop setups particularly well. It increases nutrient bioavailability by 10–15%, reduces feed consumption by 20–30%, and produces less dusty waste — all useful when you’re managing a humidity-sensitive environment. Submerge layer mash or pellets in water for 2–3 days until the mix smells pleasantly sour, then feed fresh daily.
Calcium, Grit, and Supplements
Offer crushed oyster shell free-choice in a separate container — never mixed into feed. Non-laying birds and chicks don’t need the calcium load, and excess calcium can damage their kidneys. Insoluble granite grit is equally important and equally separate: it’s what hens use to grind feed in their gizzard. If they’re eating anything other than commercial mash, grit should be available at all times.
Greenhouse Foraging as a Natural Feed Supplement
This is one of the most tangible practical benefits of the integrated system. Chickens will actively hunt aphids, fungus gnats, slugs, and whitefly larvae — common greenhouse pests that are otherwise tedious to control. Supervised sessions of 30–60 minutes during pest outbreaks can make a genuine dent in populations without any chemicals.
Foods That Are Toxic to Chickens Near Your Garden
Growing a greenhouse means your chickens will be near plants that can harm them. Know this list:
- Avocado (all parts) — persin causes cardiac distress and can be fatal
- Tomato and potato leaves/green parts — solanine toxicity; ripe tomato fruit is fine in small amounts
- Rhubarb leaves — high oxalic acid content
- Raw dried beans — phytohaemagglutinin toxicity
- Onions in large quantities — hemolytic anemia
- Chocolate — theobromine toxicity
Water Management
Hens drink 1–2 cups of water per day under normal conditions, rising to 2–4 cups when temperatures exceed 85°F (29°C). In a greenhouse, open waterers contribute meaningfully to ambient humidity. Switch to nipple waterers to eliminate spillage and reduce evaporation. In winter, a heated waterer base prevents freezing without the fire risk of a heat lamp. (Farm Innovators Model HP-125)
Seasonal Care: Keeping the System Running Year-Round
Winter: Maximising Heat Sharing and Preventing Frostbite
Winter is when the integrated system pays off most clearly. The shared wall becomes a genuine heat exchanger — chicken body heat flows into the greenhouse overnight, while daytime solar gain flows back into the coop. Keep the greenhouse side of the shared wall clear of insulation to maximise this exchange.
Check regularly that snow and ice aren’t blocking vents. A sealed coop with a full flock can build dangerous ammonia levels within hours. Use a heated waterer base and make sure roost bars are the correct 1.5–2 inch diameter to protect toes from frostbite.
Spring: Transitioning Chickens Into the Active Greenhouse
Start with short, supervised sessions as temperatures rise and daylight extends. Protect seedlings with hardware cloth barriers before opening the pop door. Begin tapering supplemental lighting as natural day length catches up to the 14–16 hour threshold — usually by late March or April in most temperate zones.
Summer: Preventing Overheating
Summer is the most overlooked risk in this system. A greenhouse can spike to 120°F (49°C) or higher on a hot day — genuinely lethal for chickens, who begin experiencing heat stress above 85°F (29°C) and can die above 104°F (40°C). Open ridge vents and side panels fully. Add shade cloth rated at 30–50% light reduction over the south-facing glass. Make sure your flock has constant access to cool, fresh water and a shaded area in the run. On extreme heat days, restrict greenhouse access entirely and focus on keeping the run cool.
Autumn: Preparing for the Integrated Winter Season
Autumn is your maintenance window. Deep-clean the coop before cold weather locks everything in. Check the shared wall for gaps, repair any hardware cloth, and test your exhaust fan and thermostat before you need them. This is also the ideal time to let your chickens do a full greenhouse cleanup — scratching through spent beds, eating overwintering pest larvae, and depositing manure before you replant.
Frequently Asked Questions
Does anyone here have a greenhouse with an attached chicken coop and run — where do I even start? Start with the shared wall. Decide whether you’re retrofitting an existing greenhouse or building from scratch, then position the coop on the north wall and plan the run on the south or east exterior. Get the ventilation right before you add birds.
How many chickens should I keep in a greenhouse-coop system? For a typical backyard greenhouse (8×12 ft to 10×16 ft), a flock of 4–6 standard hens is manageable. That’s enough body heat to make a difference in winter without overwhelming the greenhouse with ammonia or humidity.
Will chickens damage my greenhouse plants? They will if given unsupervised access. Use a pop door to control when they enter, install hardware cloth barriers around seedlings, and limit sessions to 30–60 minutes. Established plants in raised beds are far more resilient than seedlings at ground level.
Do I need a heat lamp in a greenhouse-coop in winter? In most climates, no — especially with cold-hardy breeds and a well-designed shared wall. If temperatures regularly drop below 0°F (-18°C), a flat-panel radiant heater is safer than a heat lamp. Never use a heat lamp in a structure with dry plant material nearby.
Can I use the deep litter method in a greenhouse-coop setup? Yes, and it works well here. The composting action generates a small amount of additional heat, and beneficial bacteria reduce ammonia. The key is maintaining the right carbon-to-nitrogen ratio — keep adding dry bedding material and turn the litter regularly to prevent wet, compacted spots.